Setup your Kubernetes cluster with helmfile

So, you have a Kubernetes cluster up and running. The control plane is live, the worker nodes are ready to handle the load. Shall we go ahead and deploy our business apps? Well, before doing that, we might want to prepare the ground a little bit. As any self respected business, we want to be able to monitor the apps that we deploy, have backups and auto scaling in place and be able to search through the logs if something goes wrong. These are just a few requirements that we’d like to solve, before actually deploying the apps.

Fortunately, there are plenty of tools that solve these infrastructure requirements. Furthermore, most of these infra apps have an associated helm chart. These are just a few examples:

  • prometheus/grafana for monitoring
  • fluent-bit for logging
  • velero for backups
  • nginx ingress controller, for load balancing
  • spinnaker for CI/CD
  • external-dns for syncing k8s services with the DNS provider
  • cluster autoscaler

and so on…

The question is: how do we deploy them in the Kubernetes cluster? And if more Kubernetes clusters are being spawned up, how can we install these infra apps in a reliable, maintainable and automated fashion?

We explored a few ways we could do it:
1. Having an umbrella helm chart
2. Using Terraform helm provider
3. Using the helmfile command line interface

In this post we’re going to explore helmfile, which we’ve been using successfully for our infra apps deployment.

Helmfile

As someone mentioned, helmfile is like a helm for your helm! It allows us to deploy helm charts, just as we’ll see in the sections below.

A basic helmfile structure

What we’ll see below is a structure inspired from Cloud Posse’s GitHub repo. We have a main helmfile, which contains a list of releases (helm charts) that we want to deploy.

helmfile.yaml

---
# Ordered list of releases.
helmfiles:
  - "commons/repos.yaml"
  - "releases/nginx-ingress.yaml"
  - "releases/kube2iam.yaml"
  - "releases/cluster-autoscaler.yaml"
  - "releases/dashboard.yaml"
  - "releases/external-dns.yaml"
  - "releases/kube-state-metrics.yaml"
  - "releases/prometheus.yaml"
  - "releases/thanos.yaml"
  - "releases/fluent_bit.yaml"
  - "releases/spinnaker.yaml"
  - "releases/velero.yaml"

Each release file (which is basically a sub-helmfile), looks something like this:

releases/ngins-ingress.yaml

---
bases:
  - ../commons/environments.yaml
---
releases:
- name: "nginx-ingress"
  namespace: "nginx-ingress"
  labels:
    chart: "nginx-ingress"
    repo: "stable"
    component: "balancing"
  chart: "stable/nginx-ingress"
  version: {{ .Environment.Values.helm.nginx_ingress.version }}
  wait: true
  installed: {{ .Environment.Values.helm | getOrNil "nginx_ingress.enabled" | default true }}
  - name: "controller.metrics.enabled"
    value: {{ .Environment.Values.helm.nginx_ingress.metrics_enabled }}

If you look above, you will see that we are templatizing the helm deployment for the nginx-ingress chart. The actual values (eg. chart version, metrics enabled) are coming from an environment file:

commons/environments.yaml

environments:
  default:
    values:
      - ../auto-generated.yaml

Where auto-generated.yaml is a simple yaml file containing the values:

helm:
  nginx_ingress:
   installed: true
   version: 1.17.1
   metrics_enabled: true
  velero:
    installed: true
    s3_bucket: my-s3-bucket
    ...

Note that in the example above we are using a single env (named default), but you could have more (eg. dev/stage/prod) and switch between them. Each environment would have their own set of values, allowing you to customize the deployment even further, as we’ll see in the section below.

With this in place, we can start deploying the helm charts in our Kubernetes cluster:

$ helmfile sync

This will start deploying the infra apps in the Kubernetes cluster. As an added bonus, the charts will be installed in the order provided in the main helmfile. This is useful if you have a chart that depends on another one to be installed first (eg. external-dns after kube2iam).

Unleashing helmfile’s templatization power

One of the most interesting helmfile features is the ability to use templatization for the helm chart values (a feature that helm lacks). Everything you see in the helmfile can be templatized. Let’s take the cluster-autoscaler as an example. Suppose we want to deploy this chart in two Kubernetes clusters: one that’s located in AWS and one that is in Azure. Because the cluster autoscaler hooks to the cloud APIs, we’ll need to customize the chart values depending on the cloud provider. For instance, AWS requires an IAM role, while Azure needs an azureClientId/azureClientSecret. Let’s see how can implement this behavior with helmfile.

Note that you can also find the below example on the GitHub helmfile-examples repo.

cluster-autoscaler.yaml

---
bases:
  - envs/environments.yaml
---
releases:
- name: "cluster-autoscaler"
  namespace: "cluster-autoscaler"
  labels:
    chart: "cluster-autoscaler"
    repo: "stable"
    component: "autoscaler"
  chart: "stable/cluster-autoscaler"
  version: {{ .Environment.Values.helm.autoscaler.version }}
  wait: true
  installed: {{ .Environment.Values | getOrNil "autoscaler.enabled" | default true }}
  set:
    - name: rbac.create
      value: true
{{ if eq .Environment.Values.helm.autoscaler.cloud "aws" }}
    - name: "cloudProvider"
      value: "aws"
    - name: "autoDiscovery.clusterName"
      value: {{ .Environment.Values.helm.autoscaler.clusterName }}
    - name: awsRegion
      value: {{ .Environment.Values.helm.autoscaler.aws.region }}
    - name: "podAnnotations.iam\\.amazonaws\\.com\\/role"
      value: {{ .Environment.Values.helm.autoscaler.aws.arn }}
{{ else if eq .Environment.Values.helm.autoscaler.cloud "azure" }}
    - name: "cloudProvider"
      value: "azure"
    - name: azureClientID
      value: {{ .Environment.Values.helm.autoscaler.azure.clientId }}
    - name: azureClientSecret
      value: {{ .Environment.Values.helm.autoscaler.azure.clientSecret }}
{{ end }}

As you can see above, we are templatizing the helm deployment for the cluster-autoscaler chart. Based on the selected environment, we will end up with AWS or Azure specific values.

envs/environments.yaml

environments:
  aws:
    values:
      - aws-env.yaml
  azure:
    values:
      - azure-env.yaml

env/aws-env.yaml

helm:
  autoscaler:
   cloud: aws
   version: 0.14.2
   clusterName: experiments-k8s-cluster
   aws:
     arn: arn:aws:iam::00000000000:role/experiments-k8s-cluster-autoscaler
     region: us-east-1

env/azure-env.yaml

helm:
  autoscaler:
    cloud: azure
    version: 0.14.2
    azure:
      clientId: "secret-value-here"
      clientSecret: "secret-value-here"

And now, to select the desired cloud provider we can run:

helmfile --environment aws sync
# or 
helmfile --environment azure sync

Templatize the entire values file

You can go even further and templatize the whole values file, by using a .gotmpl file.

releases:
  - name: "velero"
    chart: "stable/velero"
    values:
      - velero-values.yaml.gotmpl

You can see an example on the GitHub helmfile-examples repo.

Using templatization for the repos file

We can define a list of helm repos from which to fetch the helm charts. The stable repository is an obvious choice, but we can also add private helm repositories. The cool thing is that we can use templatization in order to provide the credentials.

commons/repos.yaml

---
repositories:
  # Stable repo of official helm charts
  - name: "stable"
    url: "https://kubernetes-charts.storage.googleapis.com"
  # Incubator repo for helm charts
  - name: "incubator"
    url: "https://kubernetes-charts-incubator.storage.googleapis.com"
  # Private repository, with credentials coming from the env file
  - name: "my-private-helm-repo"
    url: "https://my-repo.com"
    username: {{ .Environment.Values.artifactory.username }}
    password: {{ .Environment.Values.artifactory.password }}

In order to protect your credentials, helmfile supports injecting environment secret values. For more details you can go here.

Tilerless

One thing that was bugging us regarding helm was the fact that it required the Tiller daemon to be installed inside the Kubernetes cluster (prior to doing any helm chart deployments). Just to refresh your mind, helm has two parts: a client (helm) and a server (tiller). Besides the security concerns, there was also added complexity in order to setup the role, service account and doing the actual Tiller installation.

The good news is that helmfile can be setup to run in a tilerless mode. When this is enabled, helmfile will use the helm-tiller plugin, which will basically run Tiller locally. No need to install the tiller daemon inside the Kubernetes cluster anymore. If you’re wondering what happens when multiple people try to install charts using this Tilerless approach, then you should worry not because the helm state information is still being stored in Kubernetes, as secrets in the selected namespace.

helmDefaults:
  tillerNamespace: helm
  tillerless: true

When running in tillerless mode, you can list the installed charts this way:

helm tiller run helm -- helm list

If you want to find out more about the plugin, here’s a pretty cool article from the main developer. We’re also looking forward for the helm3 release, which will get rid of Tiller altogether.

Conclusion

Helmfile does its job and it does it well. It has a strong community support, and the templatization power is just wow. If you haven’t already, go ahead and give it a spin: https://github.com/roboll/helmfile

Remove docker image by id

Find out the docker image id:

docker images
REPOSITORY TAG IMAGE ID CREATED SIZE
latest 51ca54d439f3 4 hours ago 2.14GB

Remove docker image by id:

docker rmi 51ca54d439f3

On a separate note, a couple of docker commands to cleanup dangling images:

docker rm $(docker ps -qa --no-trunc --filter "status=exited")
docker rmi $(docker images --filter "dangling=true" -q --no-trunc)

Automating the creation of fully fledged Kubernetes clusters in Amazon (AWS EKS)

With Kubernetes gaining traction, more and more teams are looking to use it. Recently, AWS announced the release of the Amazon EKS (Elastic Kubernetes Service), which means we can now deploy Kubernetes in AWS, more-or-less as a managed service. I say more or less because AWS takes good care of managing the Kubernetes control plane (the master nodes), but you have to manage the worker nodes (which you can launch as EC2 instances in one ore more Auto Scale Groups).

Launching an AWS EKS cluster has quite a few steps, since you have to first create a VPC, subnets, IAM roles and other AWS resources.

Simplifying Kubernetes cluster creation in AWS EKS

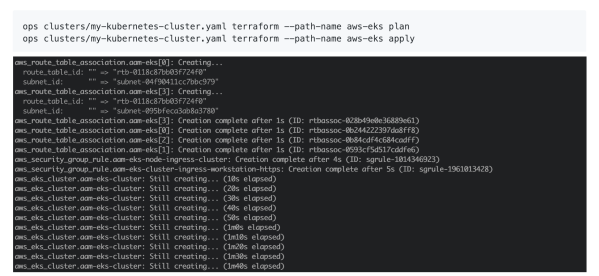
In order to quickly spin up Kubernetes clusters (in a repeatable and automated fashion), we can use an open source tool created by Adobe named ops-cli, along with Terraform from HashiCorp. Terraform supports deploying a Kubernetes cluster in AWS (via what’s called an Amazon Elastic Kubernetes service). We are using ops-cli to perform templating of this AWS EKS terraform module, so that we can re-use it. This allows us to deploy multiple Kubernetes clusters, across different regions/environments.

Once the Kubernetes cluster is up and running, we want to install some common packages before deploying our own apps. These can include: cluster-autoscaler, logging (eg. Fluentd), metrics (eg. Prometheus), tracing (eg. New Relic), continuous deployment (eg. Spinnaker) and so forth. Luckily, these are all already available, packaged as Helm charts (https://github.com/helm/charts/tree/master/stable).

What’s nice about this, is that we can use Terraform to deploy Helm charts inside our newly created Kubernetes cluster. This can be achieved via the Helm Terraform provider (https://github.com/terraform-providers/terraform-provider-helm). The ops-cli is handy in order to minimize code duplication when deploying these common helm packages via Terraform.

There’s a fully working example on the Adobe GitHub page, which deploys a Kubernetes cluster in AWS using ops-cli + terraform + helm, along with the aforementioned services inside the Kubernetes cluster itself: https://github.com/adobe/ops-cli/tree/master/examples/aws-kubernetes

Deploying Spinnaker on Minikube (Kubernetes) using Hal


Spinnaker

Spinnaker is an open source, multi-cloud continuous delivery platform for releasing software changes with high velocity and confidence.

To install Spinnaker locally follow the next steps. They will walk you through installing a local Kubernetes cluster (using Minikube) and deploying Spinnaker on it using Halyard.

If you plan to deploy Spinnaker on a remote Kubernetes cluster (AWS EKS, GKE / other), the steps are pretty similar.

Install Minikube

Minikube provides a way to run Kubernetes locally. Minikube runs a single-node Kubernetes cluster inside a VM on your laptop for users looking to try out Kubernetes or develop with it day-to-day.

To install Minikube, follow the steps here, depending on your platform: https://kubernetes.io/docs/tasks/tools/install-minikube/

Start Minikube. Take into consideration that Spinnaker is composed out of multiple microservices, so you’ll need quite some memory and cpu to run it locally.


minikube start --cpus 4 --memory 8192

Optional: Install Minio for S3 storage

Spinnaker needs a persistent storage, usually AWS S3. Instead of using an actual AWS S3 bucket, you can install a local server that mimics the AWS S3 API. This is where Minio comes into place.

To download Minio go here.
To start Minio locally:


export MINIO_ACCESS_KEY=minio
export MINIO_SECRET_KEY=miniostorage
minio server /tmp/minio_s3_data

Install Halyard

Halyard is a tool for configuring, installing, and updating Spinnaker.

For MacOS:


curl -O https://raw.githubusercontent.com/spinnaker/halyard/master/install/macos/InstallHalyard.sh
sudo bash InstallHalyard.sh

For other platforms go here.

Configure for Minikube (Kubernetes) deployment

At this point you should have the Minio server up and running alongside Minikube.
kubectl should also work


kubectl get nodes
NAME STATUS ROLES AGE VERSION
Minikube Ready  28d v1.10.3

Hal: Setup Spinnaker storage


hal config storage s3 edit --access-key-id minio --secret-access-key --region us-east-1 --endpoint http://127.0.0.1:9000

hal config storage edit --type s3

Hal: Configure Docker registry

At least a docker registry is required for the Spinnaker kubernetes setup. You can add the public docker registry:


hal config provider docker-registry account add dockerhub --address index.docker.io --repositories library/nginx

And you can even add your private Docker registries:


# hal config provider docker-registry account add docker-private-repo --address https://my-private-docker-repo.example.com --username myuser  --password

You then need to enable the docker-registry provider:


hal config provider docker-registry enable

Hal: Configure the Spinnaker Kubernetes provider


hal config provider kubernetes account add my-k8s-account --docker-registries dockerhub --context $(kubectl config current-context)

hal config provider kubernetes enable

hal config deploy edit --type=distributed --account-name my-k8s-account

Hal: Configure Spinnaker version

To view the full version list:


hal version list

To setup the desired version:


hal config version edit --version 1.8.0

Hal: Deploy spinnaker to Minikube (Kubernetes)


hal deploy apply

This will take a while. Hal will try to spin up all the required Spinnaker pods in the Kubernetes cluster.
You can see them in action by running


kubectl get pods --namespace spinnaker
NAME READY STATUS RESTARTS AGE
spin-clouddriver-bootstrap-v000-fjhqs 1/1 Running 0 2h
spin-clouddriver-v000-sm728 1/1 Running 0 2h
spin-deck-v000-zwf69 1/1 Running 0 2h
spin-echo-v000-fwfm5 1/1 Running 0 2h
spin-front50-v000-njdzn 1/1 Running 0 2h
spin-gate-v000-4kn5z 1/1 Running 0 2h
spin-igor-v000-msbj2 1/1 Running 0 2h
spin-orca-bootstrap-v000-64cg8 1/1 Running 0 2h
spin-orca-v000-9lgp4 1/1 Running 0 2h
spin-redis-bootstrap-v000-xtldr 1/1 Running 0 2h
spin-redis-v000-vffcd 1/1 Running 0 2h
spin-rosco-v000-jvhh4 1/1 Running 0 2h

Connect to Spinnaker

Once everything is done, it’s time to connect to the Spinnaker UI. You can run:


hal deploy connect

If you don’t wanna use hal to connect, you can do a port forwarding to the Spinnaker pods:


alias spin_gate='kubectl port-forward -n spinnaker $(kubectl get pods -n spinnaker -o=custom-columns=NAME:.metadata.name | grep gate) 8084:8084'

alias spin_deck='kubectl port-forward -n spinnaker $(kubectl get pods -n spinnaker -o=custom-columns=NAME:.metadata.name | grep deck) 9001:9000'

alias spinnaker='spin_gate &; spin_deck &'

And then run:


❯ spinnaker
[1] 20836
[2] 20840

❯ Forwarding from 127.0.0.1:8084 -> 8084
Forwarding from [::1]:8084 -> 8084
Forwarding from 127.0.0.1:9001 -> 9000
Forwarding from [::1]:9001 -> 9000

Open your browser and go to http://localhost:9001

Screenshot 2018-07-06 02.08.21.png

Using protobuf + parquet with AWS Athena (Presto) or Hive

Problem

Given a (web) app, generating data, it comes a time when you want to query that data – for Analytics, reporting or debugging purposes.

Even when dealing with TBs of data representing the (web) app records, it would be extremely useful to be able to just do:

SELECT * from web_app WHERE transaction_id = 'abc';

and get a result like:

Customer Date Server Errors Target URL Request Headers transaction_id
AwesomeCustomer1 2020-12-12 12:00:00 mywebapp3 [{1003, “Invalid payload received”}] /upload abc

or

SELECT customer_name, count(*) as total_requests
FROM web_app
WHERE month = 'June' and year = '2020'
GROUP BY customer_name
ORDER BY total_requests DESC
customer_name total_requests
AwesomeCustomer1 11,330,191
OtherAwesomeCustomer 9,189,107
IsAwesome 2,900,261

or

SELECT customer_name, sum(cost) as total_cost 
FROM web_app
WHERE month = 'June' and year = '2020'
GROUP BY customer_name
ORDER BY total_cost DESC
LIMIT 10
customer_name total_cost
AwesomeCustomer1 $171,333
OtherAwesomeCustomer $150,018
IsAwesome $55,190

Well, it turns out that you can do exactly this! Even with TBs and even PBs of data.

A typical example might be a server app generating data which we decide to store (e.g. in Amazon S3, or Hadoop File System). Suppose our app is generating protobuf messages (for instance, one probouf message for each HTTP request). We then want to be able to run queries on top of this data.

Obviously, we might have multiple (web) app servers generating a lot of data. We might generate TBs or even PBs of data and want to be able to query it in a timely fashion.

Solution

In order to make it easy to run queries on our data, we can use tools such as Amazon Athena (based on Presto), Hive or others. These allow us to use standard SQL to query the data, which is quite nice. These tools work best (in terms of speed and usability) when our data is in a columnar storage format, such as Apache Parquet.

Data Flow

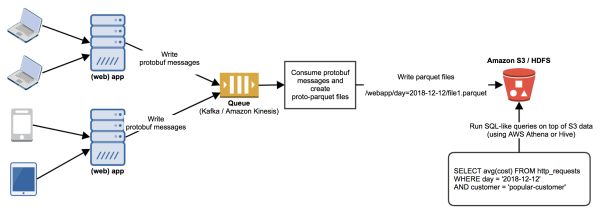
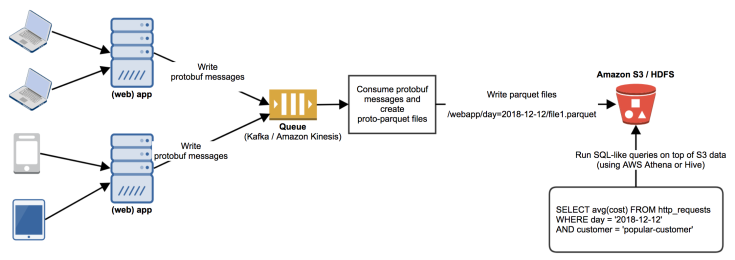
A typical example for the flow of data would be something like this:
1. (Web) app generates a (protobuf) message and writes it to a queue (such as Kafka or Amazon Kinesis). This is our data producer.
2. A consumer would read these messages from the queue, bundle them and generate a parquet file. In our case we’re dealing with protobuf messages, therefore the result will be a proto-parquet binary file. We can take this file (which might contain millions of records) and upload it to a storage (such as Amazon S3 or HDFS).
3. Once the parquet data is in Amazon S3 or HDFS, we can query it using Amazon Athena or Hive.

So let’s dive and see how we can implement each step.

1. Generate protobuf messages and write them to a queue

Let’s take the following protobuf schema.

message HttpRequest {

    string referrer_url = 1;
    string target_url = 2;                     // Example: /products
    string method = 3;                         // GET, POST, PUT, DELETE etc.
    map request_headers = 4;
    map request_params = 5;    // category=smartphones
    bool is_https = 6;
    string user_agent = 7;

    int32 response_http_code = 8;
    map response_headers = 9;

    string transaction_id = 10;
    string server_hostname = 11;
}

Protobuf (developed by Google) supports a number of programming languages such as: Java, C++, python, Objective-C, C# etc.

Once we have the protobuf schema, we can compile it. We’ll use Java in our example.

We now have created the protobuf messages. Each message contains information information about a single HTTP request. You can think of it as a record in an database table.

In order to query billions of records in a matter of seconds, without anything catching fire, we can store our data in a columnar format (see video). Parquet provides this.

2. Generate Parquet files

Once we have the protobuf messages, we can batch them together and convert them to parquet. Parquet offers the tool to do this.

public class ParquetGenerator {

    public static void main(String[] args) throws IOException {

        List messages = fetchMessagesFromQueue(1000);

        log.info("Writing {} messages to the parquet file.", messages.size());
        Path outputPath = new Path("/tmp/file1.parquet");
        writeToParquetFile(outputPath, messages);
    }

    /**
     * Converts Protobuf messages to Proto-Parquet and writes them in the specified path.
     */
    public static void writeToParquetFile(Path file,
                                          Collection messages) throws IOException {

        Configuration conf = new Configuration();
        ProtoWriteSupport.setWriteSpecsCompliant(conf, true);

        try (ParquetWriter writer = new ParquetWriter(
                                                file,
                                                new ProtoWriteSupport(HttpRequest.class),
                                                GZIP,
                                                PARQUET_BLOCK_SIZE,
                                                PARQUET_PAGE_SIZE,
                                                PARQUET_PAGE_SIZE, true,
                                                false,
                                                DEFAULT_WRITER_VERSION,
                                                conf)) {
            for (HttpRequest record : messages) {
                writer.write(record);
            }
        }
    }
}

Note: We are using protobuf 1.10.1-SNAPSHOT which has added Hive/Presto (AWS Athena) support in ProtoParquet

3. Upload the data in Amazon S3

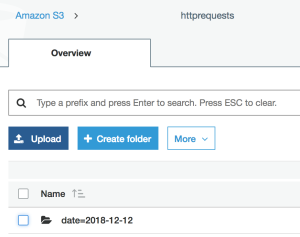
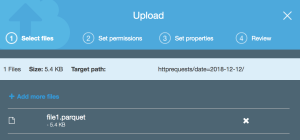
In the previous step we just wrote the file on the local disk. We can now upload it to Amazon S3 or Hive. We’ll use S3 in our example.

s3-p1

s3-p2

4. Query the parquet data

Once the data is stored in S3, we can query it. We’ll use Amazon Athena for this. Note that Athena will query the data directly from S3. No need to transform the data anymore to load it into Athena. We just need to point the S3 path to Athena and the schema.

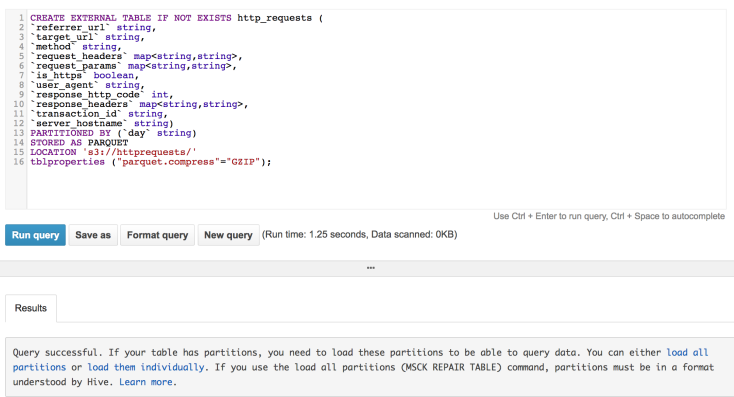
a. Let’s create the Athena schema

athena1.png

CREATE EXTERNAL TABLE IF NOT EXISTS http_requests (
`referrer_url` string,
`target_url` string,
`method` string,
`request_headers` map,
`request_params` map,
`is_https` boolean,
`user_agent` string,
`response_http_code` int,
`response_headers` map,
`transaction_id` string,
`server_hostname` string)
PARTITIONED BY (`date` string)
STORED AS PARQUET
LOCATION 's3://httprequests/'
tblproperties ("parquet.compress"="GZIP");

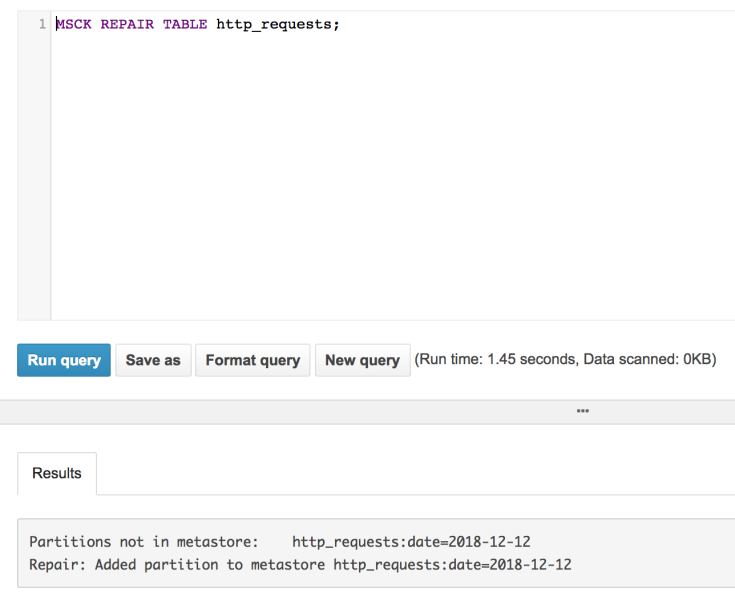
b. Let’s load the partitions

athena2.png

MSCK REPAIR TABLE http_requests;

Note: You can use AWS Glue to automatically determine the schema (from the parquet files) and to automatically load new partitions.

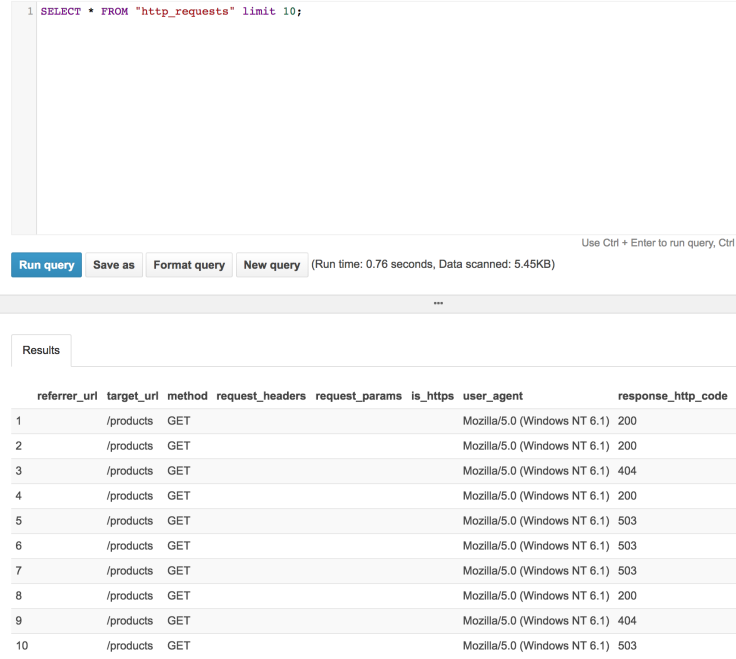
c. Let’s do a test query

query1.png

d. Let’s do a more complex query

Concatenate two or more optional strings in Java 8

Suppose you have multiple Optional objects and you want to concatenate them. Perhaps even use a delimiter.


Optional first = Optional.ofNullable(/* Some string */);
Optional second = Optional.ofNullable(/* Some second string */);
Optional second = Optional.ofNullable(/* Some third string */);
Optional result = /* Some fancy function that concats first second and third */;

Well, using Java 8 streams, we can achieve this pretty nicely.


@Value.Immutable
public abstract class Person {

    public Optional<String> firstName() {
        return Optional.of("John");
    }

    public Optional<String> lastName() {
        return Optional.of("Smith");
    }

    public Optional<String> location() {
        return Optional.of("Paris");
    }

@Value.Lazy
    public String concat() {

        return Stream.of(firstName(), lastName(), location())
                .filter(Optional::isPresent)
                .map(Optional::get)
                .filter(StringUtils::isNotBlank)
                .reduce((first, second) -> first + '.' + second)
                .orElse("");
    }
 

Note that the concat() method performs string concatenations without using a StringBuilder (which might not be performant if you call the method a lot of times). To fix this, in the above example we’re using Immutables’ [1] @Value.Lazy, which makes sure the concat() method is called once and the result is cached for further calls. Works great! More info here [2].

[1] https://immutables.github.io
[2] https://stackoverflow.com/questions/46473098/concatenate-two-or-more-optional-string-in-java-8

Delete KEYS from AWS Elasticache (Redis)

1. On the EC2 instance install redis-cli

sudo yum install gcc
wget http://download.redis.io/redis-stable.tar.gz
tar xvzf redis-stable.tar.gz
cd redis-stable
make distclean      // ubuntu systems only
make

2. Lookup primary endpoint of the Redis cluster in the AWS Console

a. Sign in to the AWS Management Console and open the ElastiCache console at https://console.aws.amazon.com/elasticache/.

b. From the navigation pane, choose Redis.

c. From the list of Redis clusters, choose the box to the left of the single-node Redis (cluster mode disabled) cluster you just created (1 in the graphic).

d. In the cluster’s details section, find the Primary Endpoint (2 in the graphic).

e. To the right of Primary Endpoint, locate and highlight the endpoint (3 in the graphic) and copy it to your clipboard for use in Step 5.2.

The form of the endpoint is in the format cluster-name.xxxxxx.node-id.region-and-az.cache.amazonaws.com:port, as shown here:

redis-01.l9gh21.0001.usw2.cache.amazonaws.com:6379

3. Suppose we want to remove all Redis Keys containing ‘mykeyword

cd src
./redis-cli -h redis-01.l9gh21.0001.usw2.cache.amazonaws.com \
-p 6379 --scan | grep mykeyword | xargs  ./redis-cli \
-h redis-01.l9gh21.0001.usw2.cache.amazonaws.com -p 6379 DEL

You should see something like this, to acknowledge the deletes:

(integer) 773
(integer) 770
(integer) 761
(integer) 769

Note that if the key contains quotes or single quotes, xargs will throw an error. To prevent that from happening we need to escape the quotes. For instance, this is how you can escape the single quotes:

cd src
./redis-cli -h redis-01.l9gh21.0001.usw2.cache.amazonaws.com \
-p 6379 --scan | grep my'keyword | sed "s/'/\\\'/g" | xargs \
./redis-cli -h redis-01.l9gh21.0001.usw2.cache.amazonaws.com \
-p 6379 DEL

(notice the `sed` command)

Resources:
[1] http://docs.aws.amazon.com/AmazonElastiCache/latest/UserGuide/GettingStarted.ConnectToCacheNode.html

SOLR: Insert large amount of documents with MapReduceIndexerTool

The problem

I recently came across a problem which consisted in finding a way to insert a large amount of documents into a SolrCloud instance. For our use case, the MapReduceIndexerTool came to help.

The solution

The MergeReduceIndexerTool is a map-reduce job that:

  • takes some input files in raw format
  • applies a morphing line which generates Solr indexable documents
  • writes the Solr indexes into HDFS

Optionally, you can merge these indexes into a running SolrCloud instance, via the go-live feature.
For more information read here. There’s a caveat though: you can only insert new documents with this tool, you can not update existing ones (see here).

How

The input data can be anything that you can think of, serialized into some file(s). For our case we had some sequence files. Just as well, it could be plain-text, zip, tar and so on. The data format could also be JSON, AVRO, csv and so forth.
Therefore, we have this input data in raw format and we want to insert it into Solr. How do we do that?

1. Install SolrCloud

We began by installing SolrCloud via Cloudera. The SolrCloud instance was based on HDFS to keep the data.

2. Locate the MapReduceIndexer tool

This comes with Cloudera. If you’re not using Cloudera, I’m pretty sure you can install it manually, since it’s open source.

3. Copy the input data into HDFS

Let’s take some sample input files. Suppose we have CSV files

4. Write a morphline

The morphline is used to parse the raw input data into Solr indexable documents.
The morphline is a plain text that has a series of commands (see below). Each command manipulates the input and hands it over to the next one. They are pipelined, similar to Unix:

$ cat list1 list2 list3 | sort | uniq > final.list.

In the same way, we could have these morphline commands:

  • Deserialize file
  • Parse AVRO and extract fields
  • Eliminate those fields that are unknown to Solr
  • Manipulate fields. For instance:
    • Convert timestamp field to native Solr timestamp format
    • Optionally: Write custom logic – we can write/re-use Java classes and use them as a command

The MapReduceIndexerTool is going to use the morph output (which is basically a Java Map) and it is going to create the Solr indexes.

Some of these morphline commands come bundled with Cloudera and can be used as-is (avro/json/csv parsing, time convert etc.). We can also write custom commands (in Java) to suit our needs.
Suppose our input data are AVRO files. Let’s check the following sample morphline: here. As you can see, there are a series of commands:

  • readAvroContainer

Parse Avro container file and for each avro object, a new SOLR record is created

  • extractAvroPaths

Extract values from an Avro object. These will map to SOLR fields, defined in your schema.xml.

  • convertTimestamp

Optionally: Convert timestamp field to native Solr timestamp format

  • sanitizeUnknownSolrFields

Deletes those record fields that are unknown to Solr schema.xml

  • loadSolr

Instructs the map-reduce job to add the record to the Solr index.

For more examples check this GitHub project.

5. Run the MapReduceIndexerTool

We can now run the map reduce job, using the morphline we’ve just created and specifying the HDFS location where the input data lies.

$ hadoop jar /opt/cloudera/parcels/CDH/lib/solr/contrib/mr/search-mr-*-job.jar \
org.apache.solr.hadoop.MapReduceIndexerTool \
-D 'mapred.child.java.opts=-Xmx500m' \
--log4j /opt/cloudera/parcels/CDH/share/doc/search*/examples/solr-nrt/log4j.properties \
--morphline-file morphline.conf \
--output-dir hdfs://nameservice1:8020/tmp/outdir \
--verbose --go-live --zk-host localhost:2181/solr

6. Check the Job Tracker

We can now go to the JobTracker and check the map-reduce job status.

 7. Make a SOLR query

Once the job is done, let’s make a SOLR query to see if the documents have been inserted successfully.
http://localhost:8983/solr/#/collection1/select?q=*:*

Java: Ninepatch for Java

I came upon this interesting project [1] that allows you to draw nine patch images using Java Graphics2D. Therefor, this project allows you to use your android’s nine patch images when drawing on an Applet or Frame in Java.

Usage:

import java.awt.Graphics;
import java.awt.Graphics2D;
import java.awt.image.BufferedImage;
import java.io.File;
import java.io.IOException;

import javax.imageio.ImageIO;
import javax.swing.JApplet;

import util.NinePatch;

public class AplletScene extends JApplet {
	/**
	 * 
	 */
	private static final long serialVersionUID = 1L;
	private NinePatch npatch;

	public AplletScene() {

	}

	@Override
	public void init() {

		BufferedImage img2 = null;
		try {
			img2 = ImageIO.read(new File("/path/to/ninepatch.9.png"));
		} catch (IOException e) {
			e.printStackTrace();
		}

		npatch = NinePatch.load(img2, true, false);
	}

	@Override
	public void paint(Graphics g) {
		Graphics2D gg = (Graphics2D) g;
		npatch.draw(gg, 0, 0, 600, 600);
	}

}

[1] http://source-android.frandroid.com/sdk/ninepatch/src/com/android/ninepatch/

Android: Using OpenGL for 2D rendering – the easy way

This is an extension to the project developed by Chris Pruett, which can be found here [1]. Feel free to read the README provided.


Basically, what this project aims to do is to offer you a simple class that can be used to render 2D objects in an OpenGL surface.

I modified a little the project written by Chris Pruett by adding a wrapper class corresponding to a scene. This allows you to use OpenGL very easily in order to render 2D objects. You can instantiate this class, add various sprites and have them drawn on the surface view.

The project can be downloaded here [2].

This is the API for the Scene class:

public interface Scene {
	public SurfaceView getSurfaceView();

	/**
	 * Sets a bitmap as the background
	 *
	 * @param bitmap
	 */
	public void setBitmapBackground(Bitmap bitmap);

	/**
	 * Sets a nine patch resource as the background. It will stretch to fill the
	 * entire screen. When screen orientation will change, this background will
	 * also change to fill the new screen.
	 *
	 * @param pictureId
	 */
	public void setNinePatchBackground(int pictureId);

	/**
	 * Sets the background color of the scene. No bitmap will be used any more
	 * for the background.
	 *
	 * @param color
	 */
	public void setBackgroundColor(CustomColor color);

	/**
	 * Adds a sprite to the scene.
	 *
	 * @param sprite
	 * @param addToMover
	 *            Whether to pass this to the Mover thread
	 */
	public void addSprite(GLSprite sprite, boolean addToMover);

	/**
	 * Sets the mover thread. This will handle the sprites' movement.
	 *
	 * @param mover
	 */
	public void setMover(Mover mover);

	/**
	 * Creates a sprite corresponding to the given resource id
	 *
	 * @param context
	 * @param resourceId
	 * @return
	 */
	public Renderable createSprite(Context context, int resourceId);

	/**
	 * Returns a sprite corresponding to a given bitmap
	 *
	 * @param bitmap
	 *            The bitmap used for the sprite
	 * @param bitmapId
	 *            The bitmap id is used to re-use textures (use same ID for same
	 *            bitmaps content)
	 * @return
	 */
	public Renderable createSprite(Bitmap bitmap, int bitmapId);

}

Usage:

public class MainActivity extends Activity {
	@Override
	public void onCreate(Bundle savedInstanceState) {
		super.onCreate(savedInstanceState);

		Scene scene = createScene();
		setContentView(scene.getSurfaceView());
	}

	private Scene createScene() {
		// our OpenGL scene
		GLScene scene = new GLScene(this);

		// can set a nine patch for the background
		scene.setNinePatchBackground(R.drawable.nine_patch_bg);

		// can set a bitmap for the background
		// scene.setBitmapBackground(someBitmap);

		// can set a color for the background
		// scene.setBackgroundColor(new CustomColor(0, 0, 0, 1));

		// create some sprites
		GLSprite sprite = scene.createSprite(getApplicationContext(), R.drawable.skate1);
		// initial position
		sprite.x = 100;
		sprite.y = 200;
		GLSprite sprite2 = scene.createSprite(getApplicationContext(), R.drawable.skate2);
		// initial position
		sprite2.x = 300;
		sprite2.y = 400;

		// add sprites to the scene
		scene.addSprite(sprite, true);
		scene.addSprite(sprite2, true);
		scene.addSprite(sprite.clone(), true);
		scene.addSprite(sprite2.clone(), true);

		// this thread controls the sprites' positions
		scene.setMover(new Mover());
		return scene;
	}
}

Preview:
GL 2D scene preview

[1] http://code.google.com/p/apps-for-android/source/browse/SpriteMethodTest/
[2] https://github.com/costimuraru/Simple-Android-OpenGL-2D-Rendering

Create a free website or blog at WordPress.com.

Up ↑